uv-k5-fw-1o11
OneOfEleven custom OEFW - Quansheng Custom Firmware with fixes, optimizations, enhancements.
Download latest flashable Release builds
Open reimplementation of the Quan Sheng UV-K5 v2.1.27 firmware
This repository is a cloned and customized version of DualTachyon’s open firmware found here ..
https://github.com/DualTachyon/uv-k5-firmware .. a cool achievement !
Use this firmware/code ENTIRELY at your own risk. This firmware is totally experimental, and at times will go completely tits up (ie, break your radio) - an entirely common occurance when playing around with experimental code.
There is absolutely no guarantee that it will work in any way shape or form on your radio(s), it may even brick your radio(s), at which point, maybe find a quiet corner to sob your hert out in.
NO REFUNDS, ever !
Radio performance
Please note that the Quansheng UV-Kx radios are not professional quality transceivers, their performance is strictly limited. The RX front end has no track-tuned band pass filtering at all, and so are wide band/wide open to any and all signals over a large frequency range.
Using the radio in high intensity RF environments will most likely make reception anything but easy (AM mode will suffer far more than FM ever will), the receiver simply doesn’t have a great dynamic range, which results in distorted AM audio with stronger RX’ed signals. There is nothing more anyone can do in firmware/software to improve that, once the RX gain adjustment I do (AM fix) reaches the hardwares limit, your AM RX audio will be all but non-existant (just like Quansheng’s firmware). On the other hand, FM RX audio will/should be fine.
But, they are nice toys for the price, fun to play with.
User customization
You can customize the firmware by enabling/disabling various compile options, this allows us to remove certain firmware features in order to make room in the flash for others. You’ll find the options at the top of “Makefile” (‘0’ = remove code, ‘1’ = include code) ..
ENABLE_CLANG := 0 **experimental, builds with clang instead of gcc (LTO will be disabled if you enable this)
ENABLE_SWD := 1 only needed if using CPU's SWD port (debugging/programming)
ENABLE_OVERLAY := 0 cpu FLASH stuff, not needed
ENABLE_LTO := 1 **experimental, reduces size of compiled firmware but might break EEPROM reads (OVERLAY will be disabled if you enable this)
ENABLE_UART := 1 without this you can't configure radio via PC
ENABLE_UART_DEBUG := 0 just for code debugging, it sends debug info along the USB serial connection (programming lead)
ENABLE_AIRCOPY := 1 clone radio-to-radio via RF
ENABLE_AIRCOPY_REMEMBER_FREQ := 1 remember the aircopy frequency
ENABLE_AIRCOPY_RX_REBOOT := 0 auto reboot on an aircopy successful RX completion
ENABLE_FMRADIO_64_76 := 0 enable FM radio 64MHz ~ 76MHz
ENABLE_FMRADIO_76_90 := 0 enable FM radio 76MHz ~ 90MHz
ENABLE_FMRADIO_76_108 := 0 enable FM radio 76MHz ~ 108MHz
ENABLE_FMRADIO_875_108 := 1 enable FM radio 87.5MHz ~ 108MHz
ENABLE_NOAA := 0 everything NOAA (only of any use in the USA)
ENABLE_VOICE := 0 want to hear voices ?
ENABLE_MUTE_RADIO_FOR_VOICE := 1 mute the radios audio when a voice is playing
ENABLE_VOX := 1 voice operated transmission
ENABLE_REDUCE_LOW_MID_TX_POWER := 1 reduce the low and mid TX power levels (high remains unchanged)
ENABLE_ALARM := 0 TX alarms
ENABLE_1750HZ := 1 side key 1750Hz TX tone (older style repeater access)
ENABLE_PWRON_PASSWORD := 0 include power-on password code
ENABLE_RESET_AES_KEY := 1 '1' = reset/clear the AES key stored in the eeprom (only if it's set)
ENABLE_BIG_FREQ := 0 big font frequencies (like original QS firmware)
ENABLE_SMALL_BOLD := 1 bold channel name/no. (when name + freq channel display mode)
ENABLE_TRIM_TRAILING_ZEROS := 1 trim away any trailing zeros on frequencies
ENABLE_KEEP_MEM_NAME := 1 maintain channel name when (re)saving memory channel
ENABLE_WIDE_RX := 1 full 18MHz to 1300MHz RX (though front-end/PA not designed for full range)
ENABLE_TX_WHEN_AM := 1 allow TX (always FM) when RX is set to AM
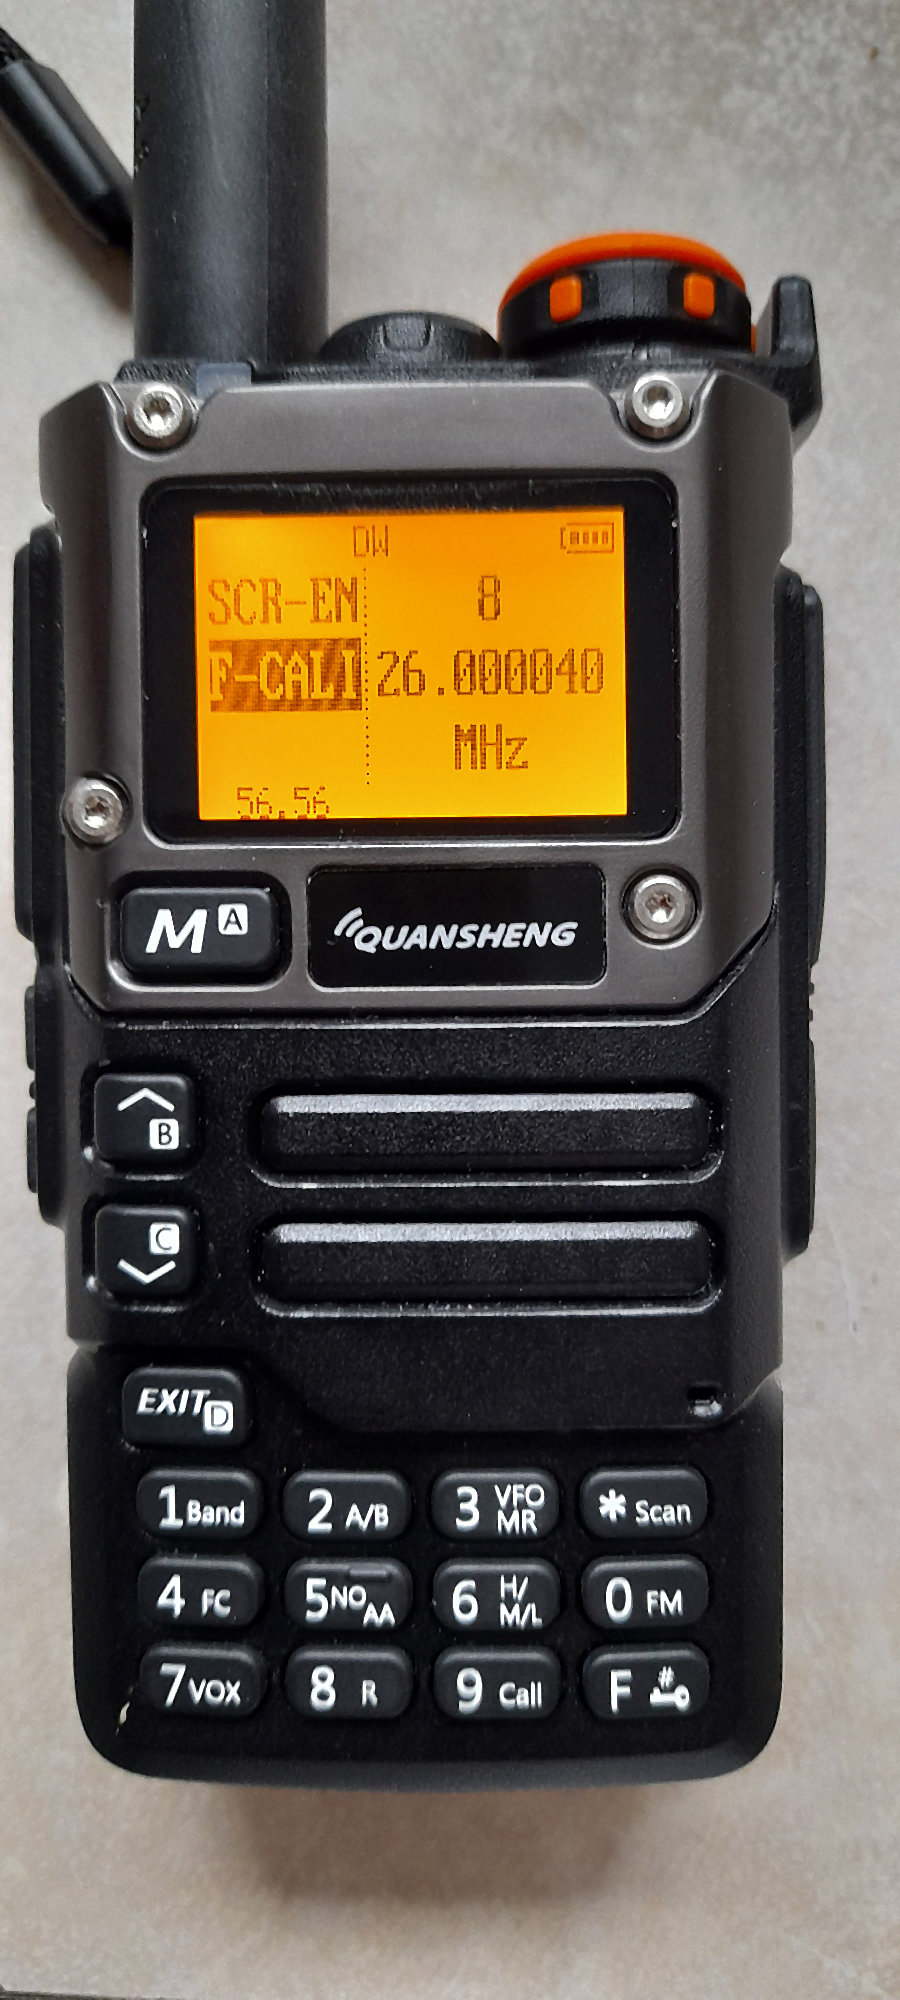
ENABLE_F_CAL_MENU := 0 enable/disable the radios hidden frequency calibration menu
ENABLE_TX_UNLOCK := 1 allow TX everywhere EXCEPT airband (108~137) .. TX harmonic content will cause interference to other services, do so entirely at your own risk !
ENABLE_CTCSS_TAIL_PHASE_SHIFT := 0 standard CTCSS tail phase shift rather than QS's own 55Hz tone method
ENABLE_CONTRAST := 0 add contrast menu
ENABLE_BOOT_BEEPS := 0 gives user audio feedback on volume knob position at boot-up
ENABLE_DTMF_CALL_FLASH_LIGHT := 1 flash the flash light LED when a DTMF call is received
ENABLE_SHOW_CHARGE_LEVEL := 1 show the charge level when the radio is on charge
ENABLE_REVERSE_BAT_SYMBOL := 0 mirror the battery symbol on the status bar (+ pole on the right)
ENABLE_FREQ_SEARCH_TIMEOUT := 0 timeout if FREQ not found when using F+4 search function
ENABLE_CODE_SEARCH_TIMEOUT := 0 timeout if CTCSS/CDCSS not found when using F+* search function
ENABLE_KILL_REVIVE := 0 include kill and revive code
ENABLE_AM_FIX := 1 dynamically adjust the front end gains when in AM mode to help prevent AM demodulator saturation, ignore the on-screen RSSI level (for now)
ENABLE_AM_FIX_SHOW_DATA := 0 show debug data for the AM fix (still tweaking it)
ENABLE_SQUELCH_MORE_SENSITIVE := 1 make squelch levels a little bit more sensitive - I plan to let user adjust the values themselves
ENABLE_SQ_OPEN_WITH_UP_DN_BUTTS := 1 open the squelch when holding down UP or DN buttons when in frequency mode
ENABLE_FASTER_CHANNEL_SCAN := 1 increase the channel scan speed, but also make the squelch more twitchy
ENABLE_COPY_CHAN_TO_VFO_TO_CHAN := 1 long press M, copy channel to VFO, or VFO to channel
ENABLE_RX_SIGNAL_BAR := 1 enable a menu option for showing an RSSI bar graph
ENABLE_TX_TIMEOUT_BAR := 0 show the remainng TX time
ENABLE_TX_AUDIO_BAR := 1 enable a menu option for showing a TX audio level bar
ENABLE_SIDE_BUTT_MENU := 1 enable menu option for configuring the programmable side buttons
ENABLE_KEYLOCK := 1 enable keylock menu option + keylock code
#ENABLE_BAND_SCOPE := 0 not yet implemented - spectrum/pan-adapter
#ENABLE_SINGLE_VFO_CHAN := 0 not yet implemented - single VFO on display when possible
First go into the hidden settings menu by power on while holding Sidekey 1 and PTT button together pushed. Make your frequency range settings under F Lock and the following settings in the menus.
New/modified function keys
- 2 different Tone Burst 1050/1750 Hz: If TX 1750 Hz is enabled, config in menu on Side Key 1 or 2 sends a 1750 Hz Tone. Up to your config in sidekey menu.
- The same side key button together with PTT sends a 1050 Hz Tone to demute 1050 Tone Squelch as by NOAA Freq channels table.
- RX / TX from 15 MHz up to 1800 MHz for example testing SW AM receiption or usage as low pwr TX Freq Jammer. The BK4819 chip frequency limit from 630 MHz to 760 MHz range is excluded.
-
NOAA US weather Freq table replaced with the first 10 PMR channels with 1050 Hz Tone Squelch.
- Long-press ‘M’ .. Copy selected channel into same VFO, then switch VFO to frequency mode *
- Long-press ‘7’ .. Toggle selected channel scanlist setting .. if VOX is disabled in Makefile
- or
- Long-press ‘5’ .. Toggle selected channel scanlist setting .. if NOAA is disabled in Makefile *
- Long-press ‘*’ .. Start scanning, then toggles the scanning between scanlists 1, 2 or ALL channels
Edit channel/memory name
- Press Menu button
- Scroll to “CH NAM” (around number 17)
- Press the Menu button to enter
- Use up/down keys to choose the desired channel to edit
- Press the Menu button again to enter edit name mode
- Use the up/down keys to cycle through the letters etc
- Press the Menu button again to move to the next character position
- Repeat steps 6 and/or 7 till you reach the end
- When it pops up the “Sure?” text, press Menu button to save, or Exit to cancel
Press the Exit button at any time to cancel the edit and return to the main menu.
Sounds a lot/complicated but once you done it a couple of times you’ll be fine (hopefully).
When you’re editing the name, you can enter digits (0 ~ 9) directly without having to use the up/down buttons to find them.
Some changes made from the Quansheng firmware
- Various Quansheng firmware bugs fixed
- Added new bugs
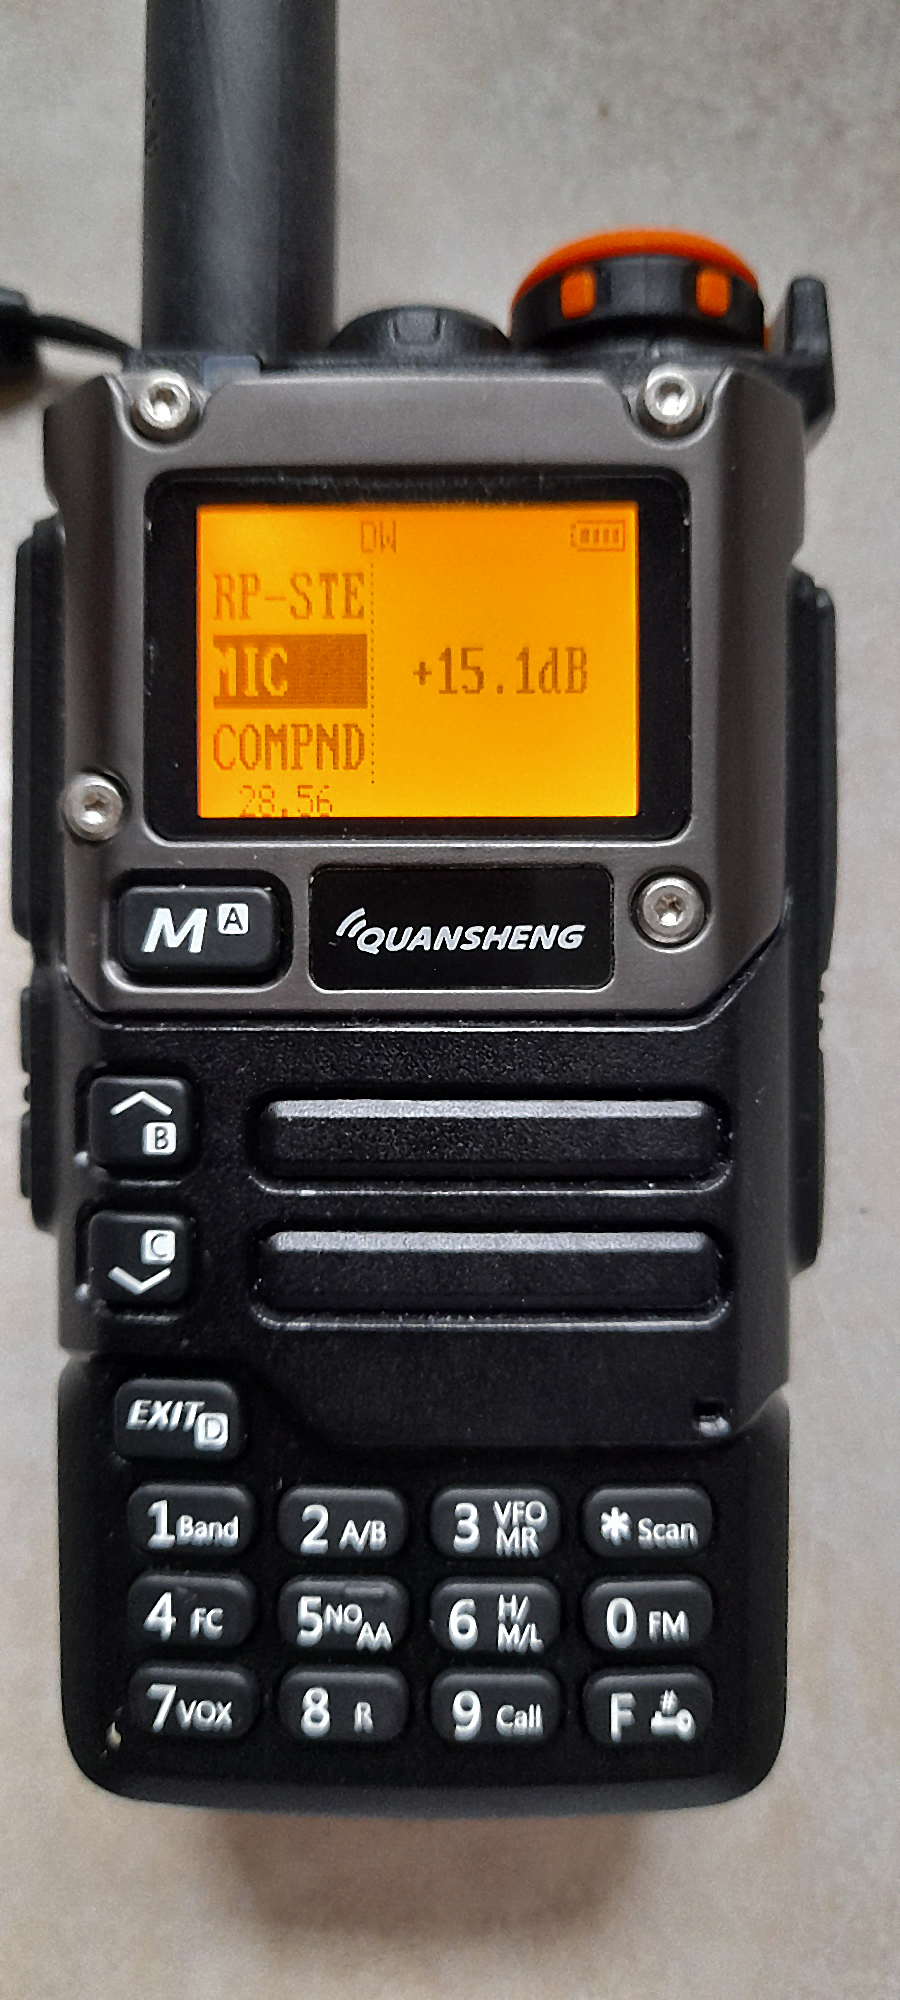
- Mic menu includes max gain possible
- AM RX everywhere (left the TX as is)
- An attempt to improve the AM RX audio (demodulator getting saturated/overloaded in Quansheng firmware)
- keypad-5/NOAA button now toggles scanlist-1 on/off for current channel when held down - IF NOAA not used
- Better backlight times (inc always on)
- Live DTMF decoder option, though the decoder needs some coeff tuning changes to decode other radios it seems
- Various menu re-wordings (trying to reduce ‘WTH does that mean ?’)
- AIRCOPY RX’ing radio now requests packet resends from TX’ing radio if RX’ed packet is lost/corrupted
- ..
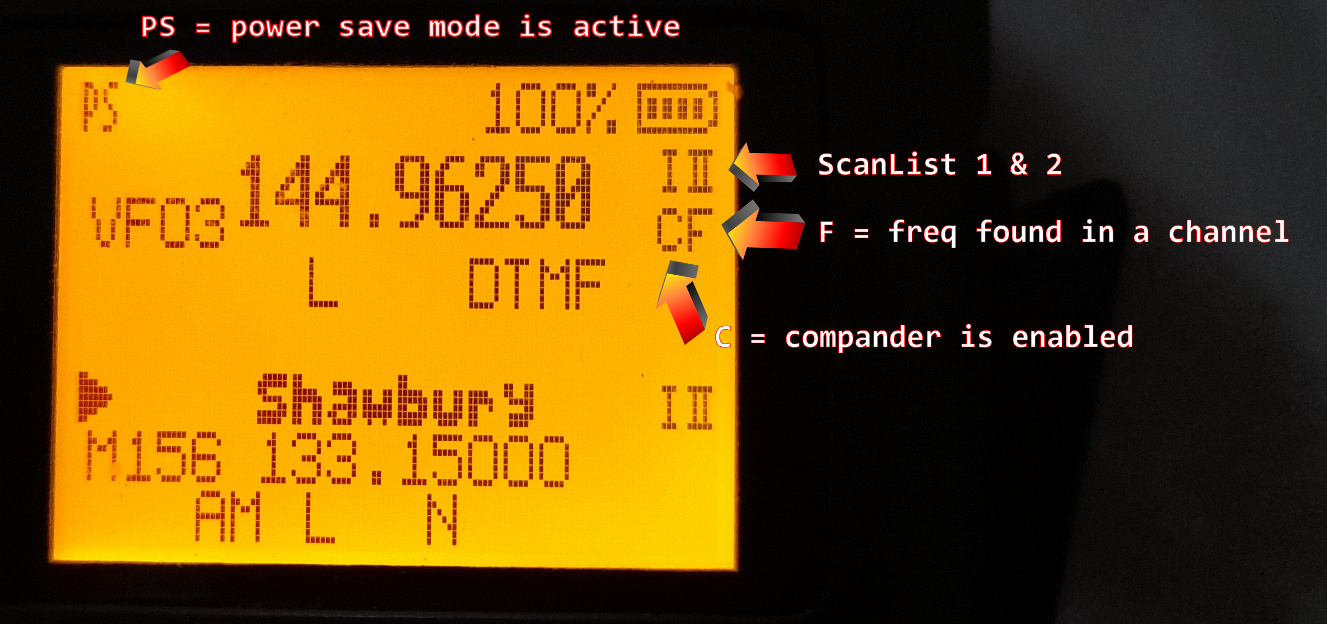
Symbol information
Compiler
arm-none-eabi GCC version 10.3.1 is recommended, which is the current version on Ubuntu 22.04.03 LTS. Other versions may generate a flash file that is too big. You can get an appropriate version from: https://developer.arm.com/downloads/-/gnu-rm
clang may be used but isn’t fully supported. Resulting binaries may also be bigger. You can get it from: https://releases.llvm.org/download.html
Building
To build the firmware, you need to fetch the submodules and then run make:
git submodule update --init --recursive --depth=1
make
To compile directly in windows without the need of a linux virtual machine:
1. Download and install "gcc-arm-none-eabi-10.3-2021.10-win32.exe" from [https://developer.arm.com/downloads/-/gnu-rm](https://developer.arm.com/downloads/-/gnu-rm)
2. Download and install "gnu_make-3.81.exe" from [https://gnuwin32.sourceforge.net/packages/make.htm](https://gnuwin32.sourceforge.net/packages/make.htm
)

3. You may need to (I didn't) manualy add gcc path to your OS environment PATH.
   ie add C:\Program Files (x86)\GNU Arm Embedded Toolchain\10 2021.10\bin

4. You may need to reboot your PC after installing the above
Then you can run ‘win_make.bat’ from the directory you saved this source code too. You may need to edit the bat file (path to make.exe) depending on where you installed the above two packages too.
I’ve left some notes in the win_make.bat file to maybe help with stuff.
Credits
Many thanks to various people on Telegram for putting up with me during this effort and helping:
- DualTachyon
- Mikhail
- Andrej
- Manuel
- @wagner
- @Lohtse Shar
- @Matoz
- @Davide
- @Ismo OH2FTG
- OneOfEleven
- @d1ced95
- and others I forget
License
Copyright 2023 Dual Tachyon https://github.com/DualTachyon
Licensed under the Apache License, Version 2.0 (the “License”); you may not use this file except in compliance with the License. You may obtain a copy of the License at
http://www.apache.org/licenses/LICENSE-2.0

Unless required by applicable law or agreed to in writing, software
distributed under the License is distributed on an "AS IS" BASIS,
WITHOUT WARRANTIES OR CONDITIONS OF ANY KIND, either express or implied.
See the License for the specific language governing permissions and
limitations under the License.
Example changes/updates
Video showing the AM fix working ..
WARNING if trying to use K5/K6 to TX out of band ..
Most of the radios TX energy is concentrated into the harmonics and other spurious carriers rather than within the fundamental ..
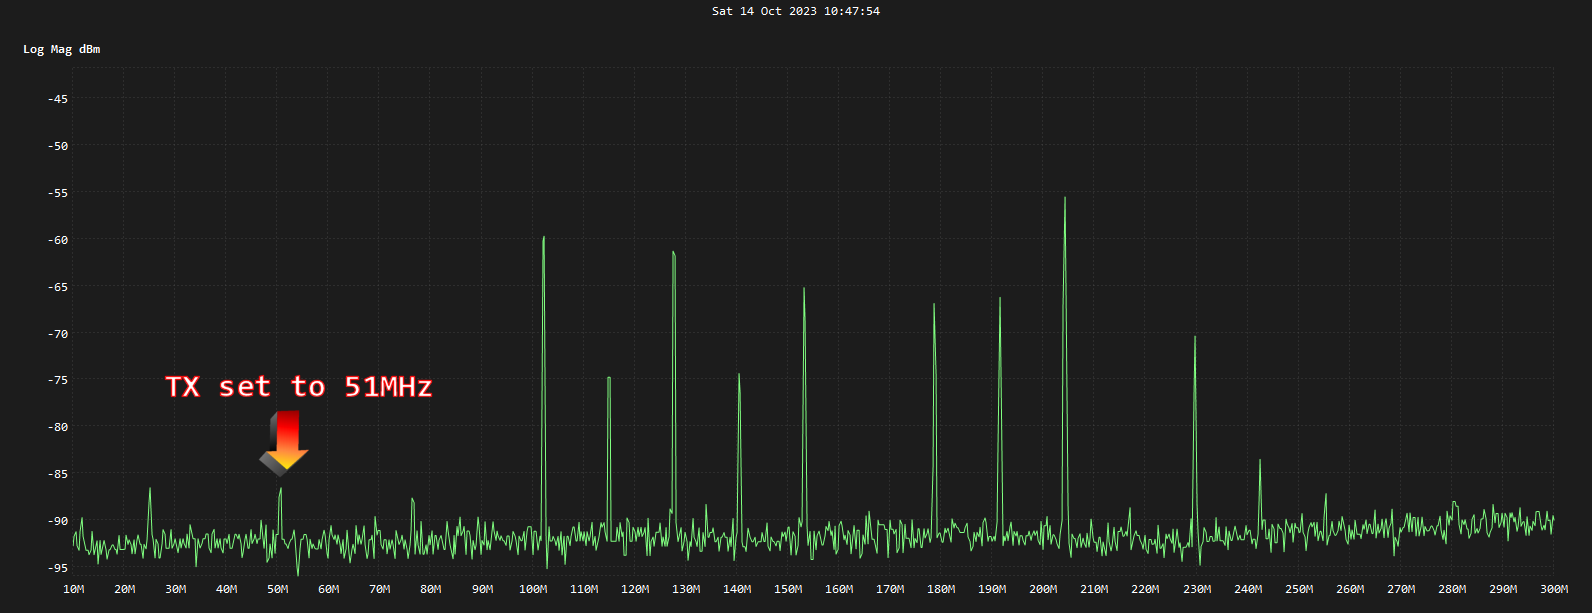
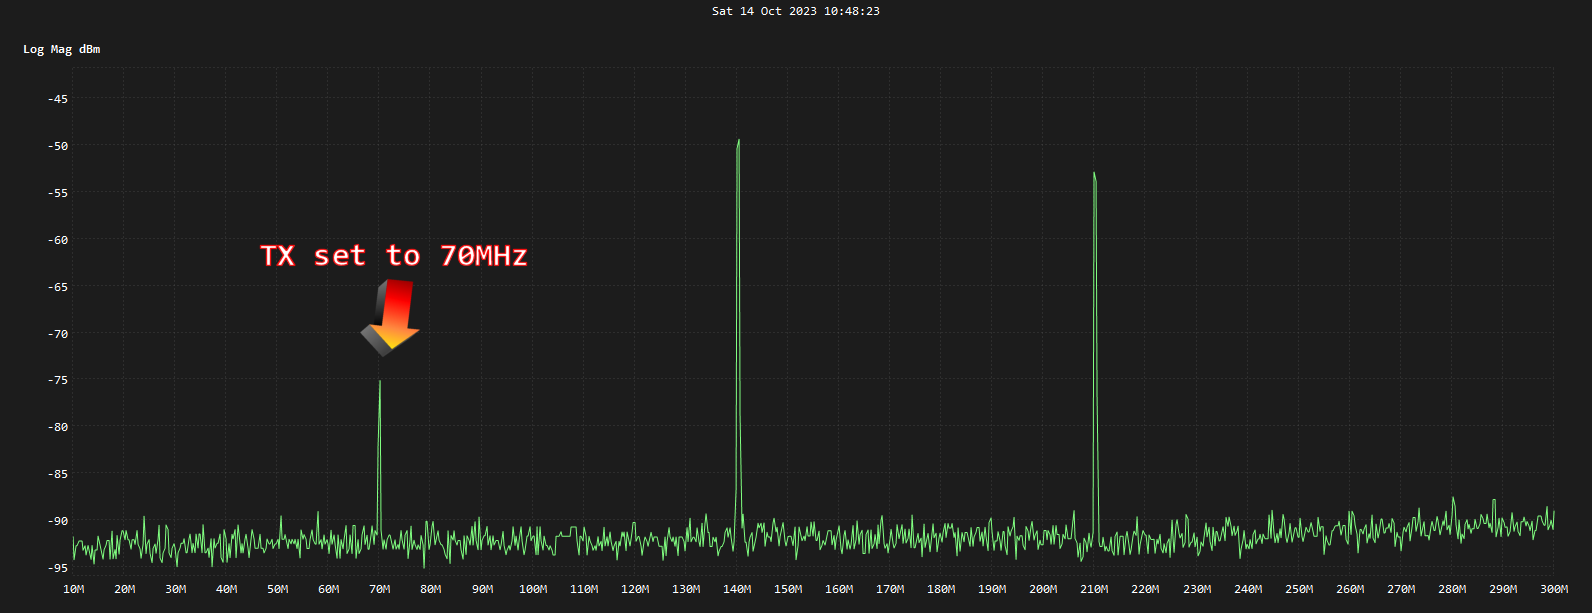
You have been warned !